
SecureDrive Support Guide
A consolidated guide for operating environments, user management, project management, DRM protection and tracking, and external link sharing.
Operating Environments
SecureDrive is a web application. Users need an internet connection and a supported browser to access the web console.
Supported Browsers
- Google Chrome
- Mozilla Firefox
- Microsoft Edge
Use the latest browser version whenever possible. Internet Explorer 11 is not supported for the SecureDrive web console.
Email Address Rules
Email addresses are case sensitive and may contain alphanumeric characters plus underscore, dash, and period characters.
Viewing DRM-Protected Files
| File / View Type | Supported Environment | Notes |
|---|---|---|
| Online browser preview | Chrome, Firefox, Edge, Safari on PC, macOS, and mobile | Use online preview when users should view documents without downloading them. |
| Downloaded PDF files | PC and macOS | Adobe Reader XI or newer, including Acrobat DC, or the HOGO Viewer App. |
| Downloaded PDF files | Android and iOS | HOGO Viewer App required. |
| Word, Excel, and PowerPoint files | Microsoft Office 2010 or newer on Windows | Requires the SecureDrive / 689Cloud COM add-in. |
689cloud.com and bookend.keyring.net.Manage Users
User management controls who can access SecureDrive and who can be added to projects. Use this section to register team members, organize users into groups, and prepare users for project collaboration.
Registering Users / Team Members
Register users before assigning them to projects. Registered users can be invited to projects, added to groups, and given permissions based on their role.
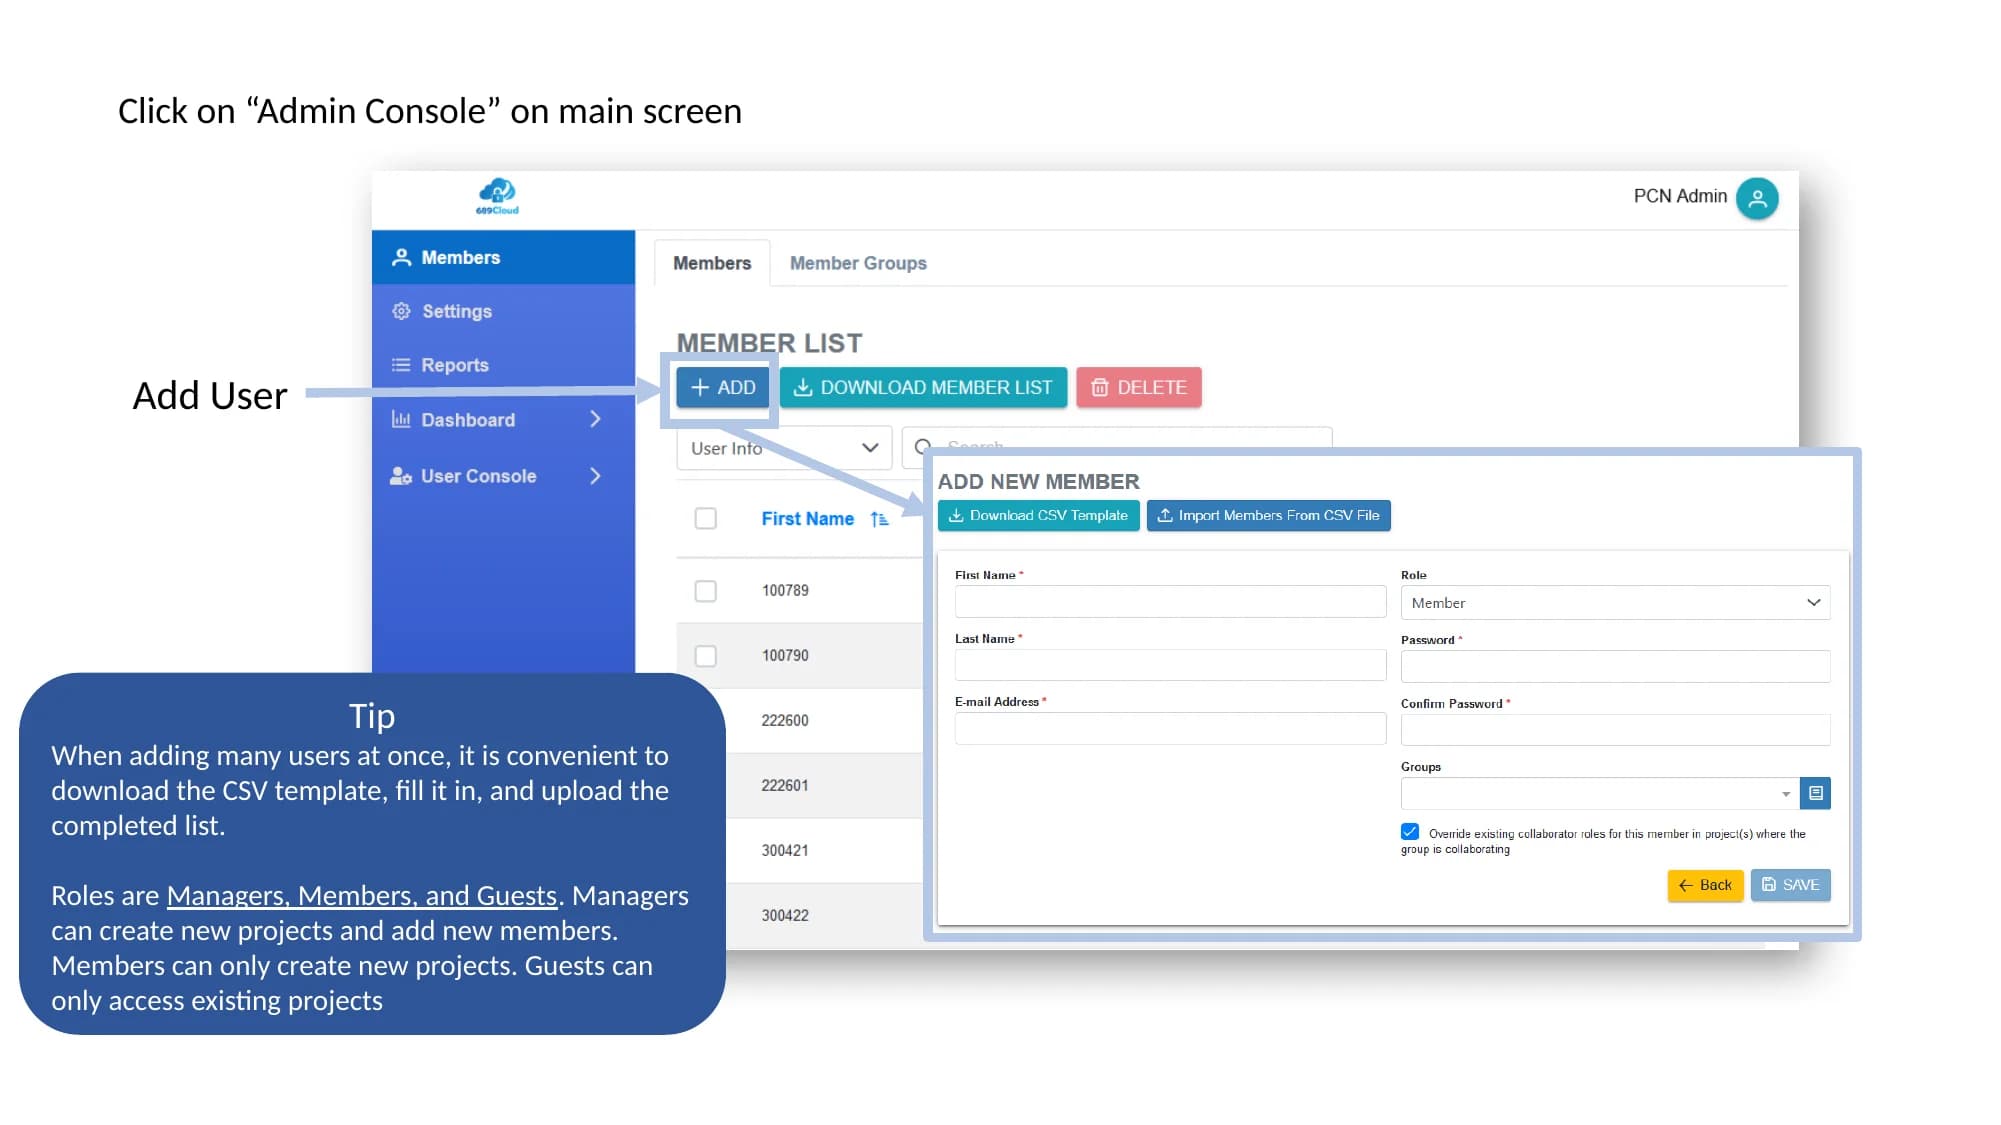
Register users from the Admin Console. The QuickStart guide also shows the available roles and the bulk CSV import option.
Open the Admin Console
From the main screen, click Admin Console to open the user administration area.
Click Add User
Choose Add User to register a new team member individually.
Enter user details
Provide the user’s email address and other required profile information. Make sure the email address is correct, because project invitations and external sharing controls depend on it.
Assign a team role
Select the appropriate role: Manager, Member, or Guest. Managers can create projects and add members. Members can create new projects. Guests can access only the projects they are invited to.
Bulk import when needed
If you need to add many users at once, download the CSV template, fill in the required values, and upload the completed file. This is the fastest way to onboard larger teams.
Review before saving
Confirm role assignments before saving. For security, give users the least privileged role that still supports their work.
Member Groups
Member groups make user administration easier when multiple people need the same access level. Groups are especially helpful for larger organizations or recurring project teams.
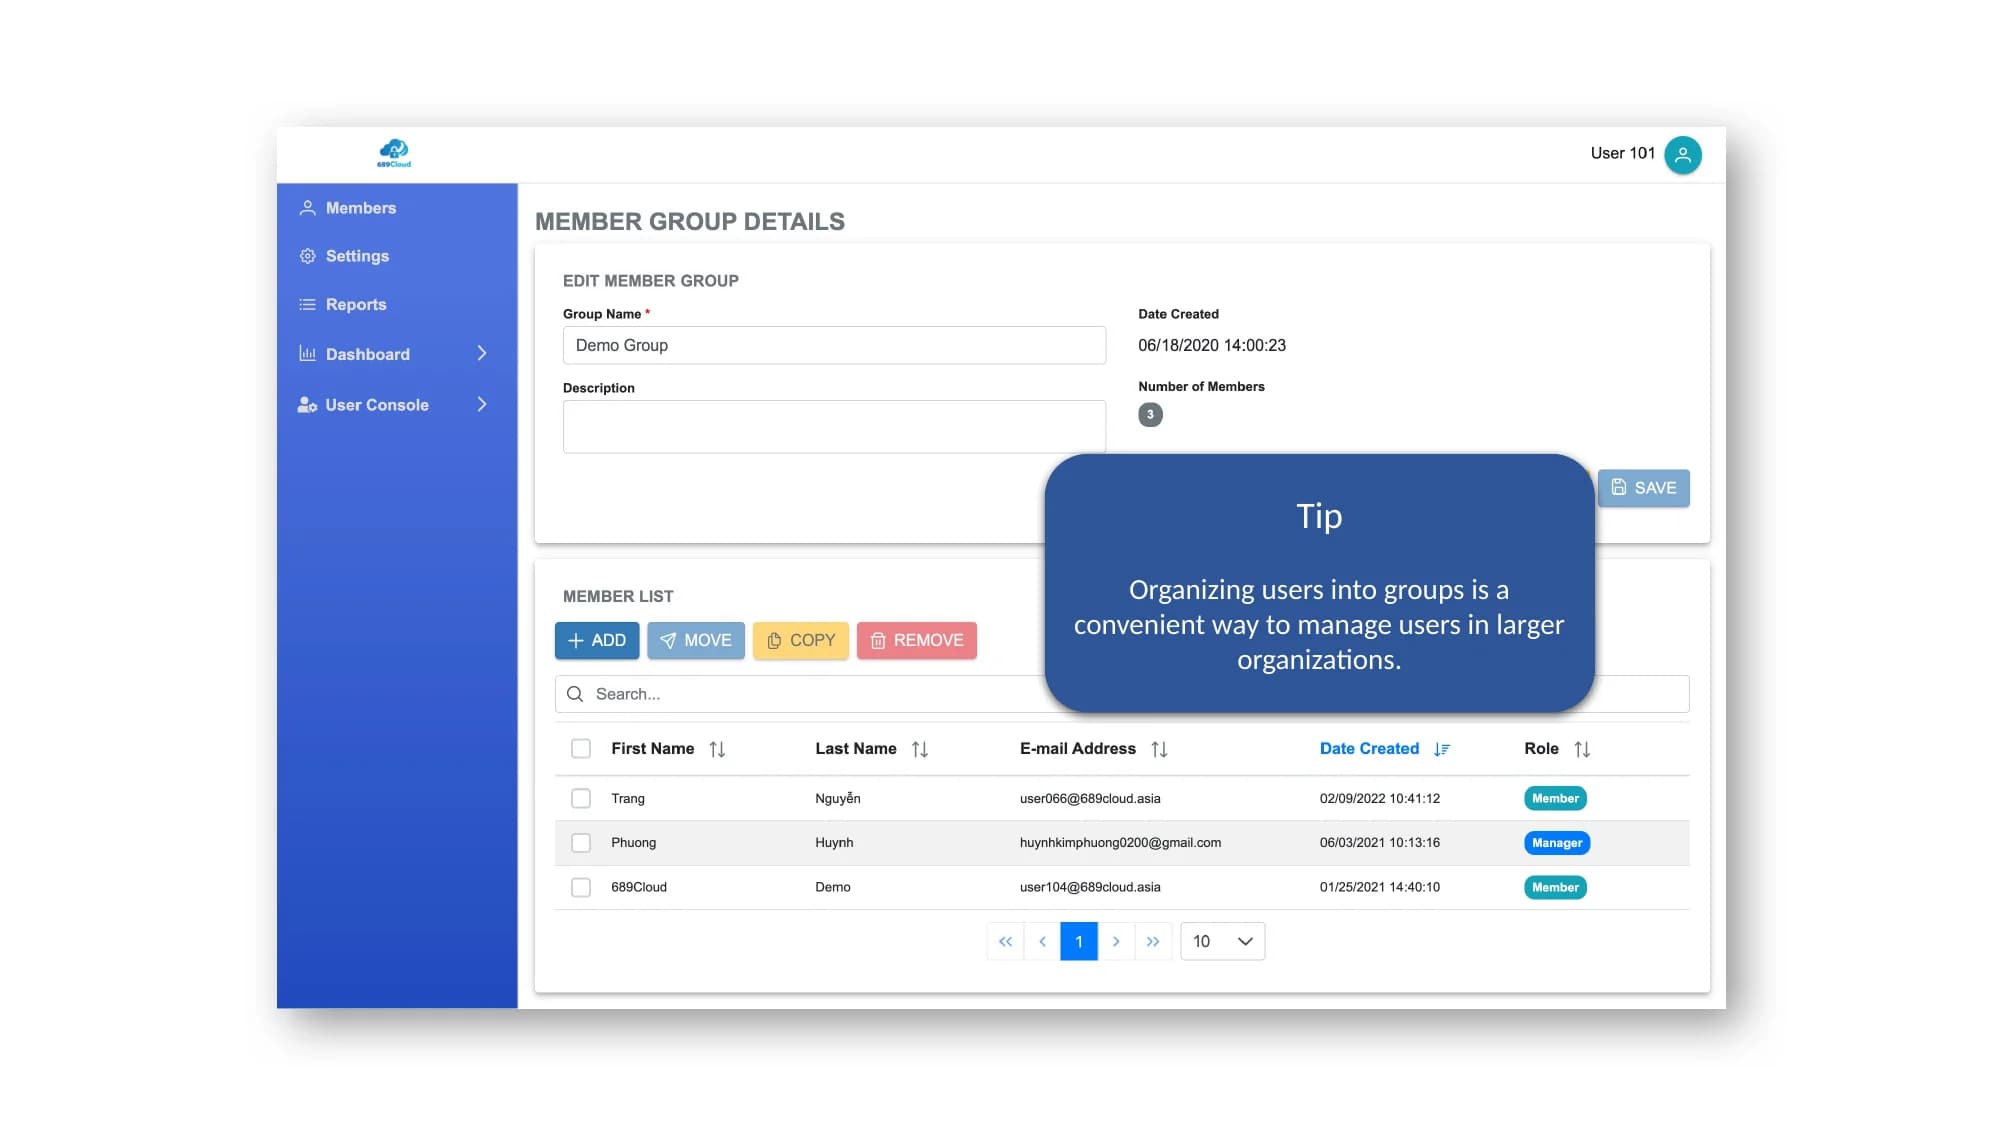
Organizing users into groups makes permission management faster and more consistent.
Create Groups
Create groups that match real collaboration needs, such as Finance, Legal, Executive Team, External Reviewers, or Partner Users.
Add Members
Add registered users to the appropriate group. Review membership regularly so old users or temporary users do not keep unnecessary access.
Use Groups in Projects
Assign groups to projects when multiple people need the same access level. This reduces repetitive manual permission work and makes project setup faster.
Manage Projects
Projects are the main collaboration containers in SecureDrive. Each project contains folders, files, members, and collaboration settings.
Main Screen
The main screen shows your registered projects and gives access to user management, project management, and account settings.
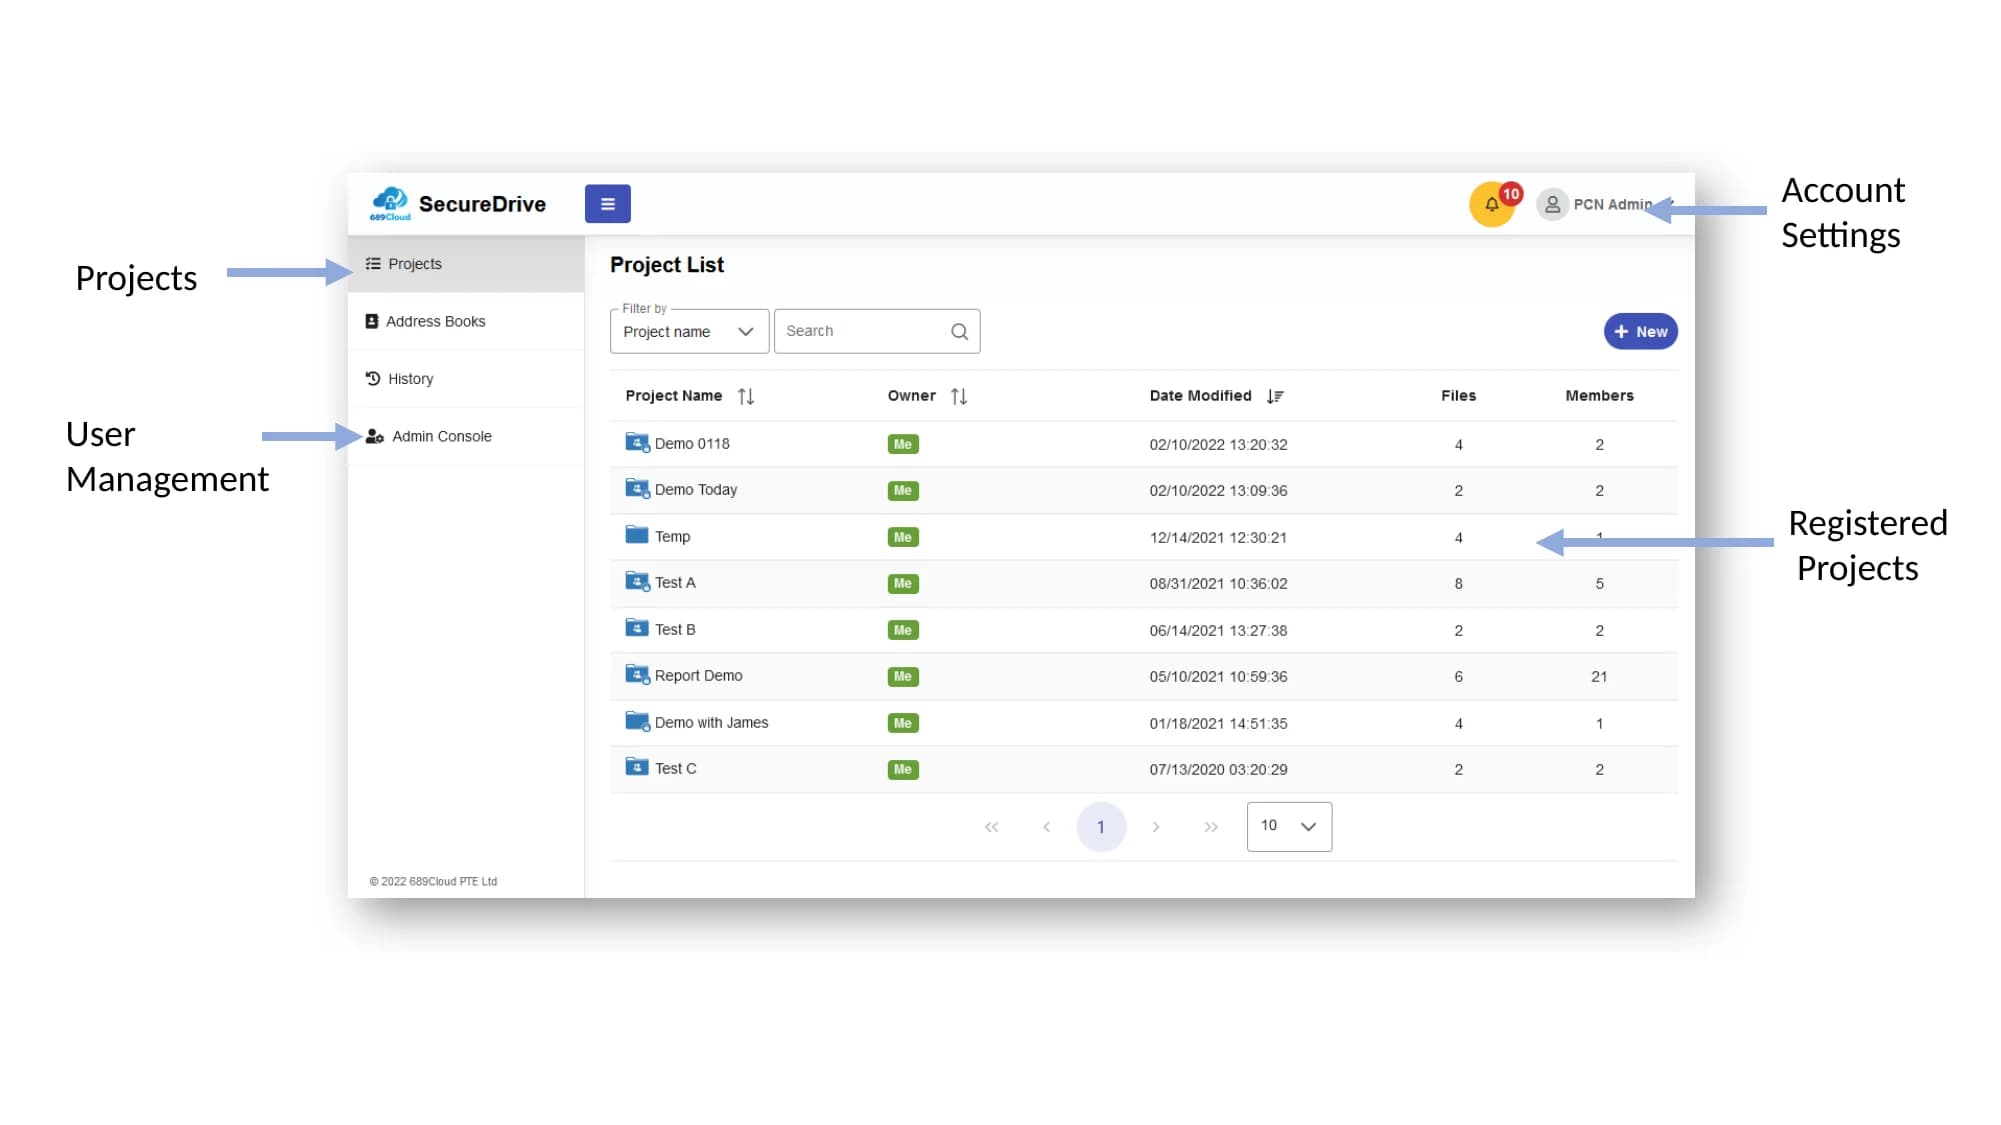
Use the main screen to move between project work, user management, and account settings.
Create New Project
Create a new project whenever you need a separate collaboration workspace for a team, a client matter, a due diligence process, or another confidential workstream.

Create the project
Choose the option to create a new project and enter a clear project name that users will immediately understand.
Open project settings
After the basic project is created, open the project settings area to configure collaborators and IRM/DRM behavior.
Choose the right collaborators
Add only the users or groups who need access. You can invite registered team members or add outside users when necessary.
Project Settings
Project settings control collaborator roles and optional automatic protection for uploaded files.
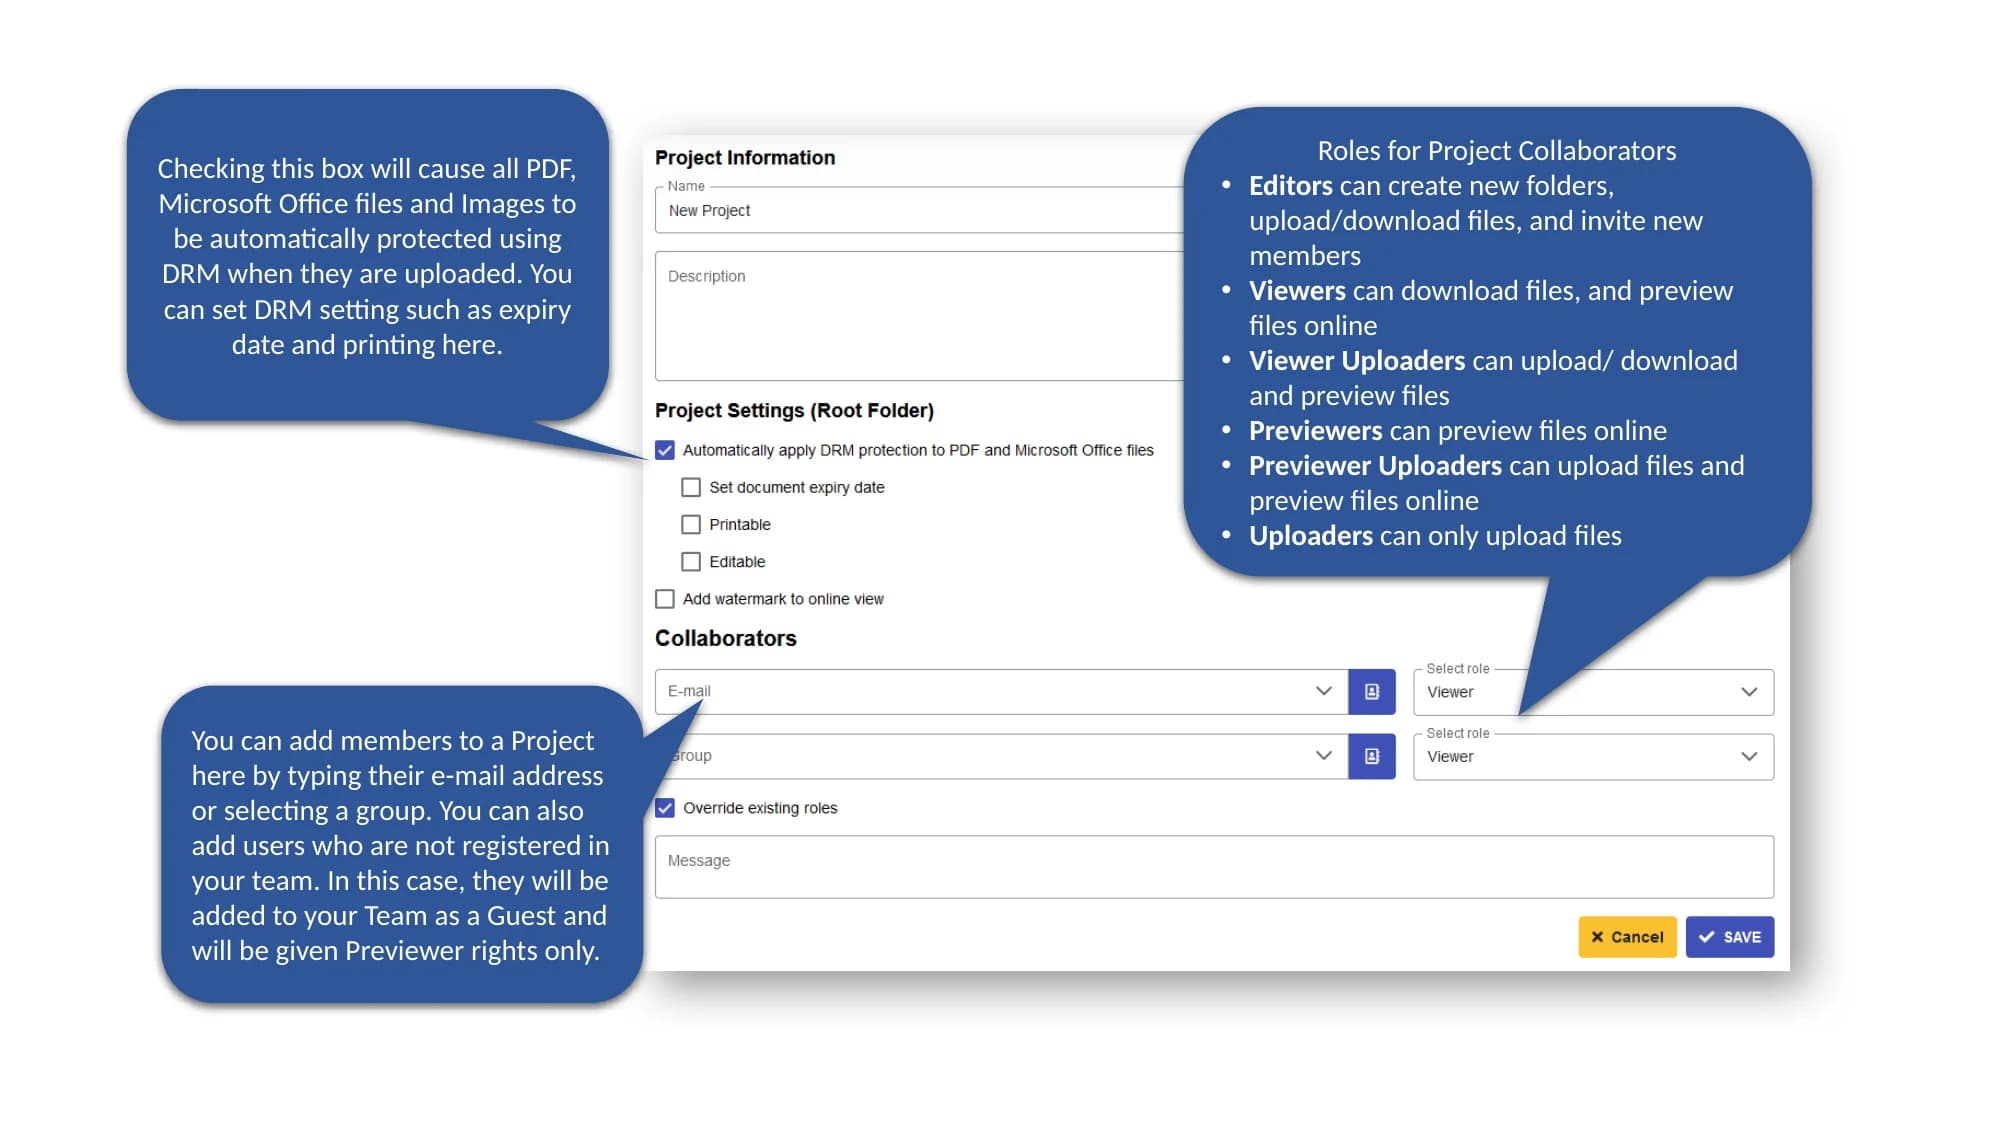
Roles for Project Collaborators
- Editors can create folders, upload and download files, and invite new members.
- Viewers can download files and preview them online.
- Viewer Uploaders can upload, download, and preview files.
- Previewers can preview files online only.
- Previewer Uploaders can upload files and preview them online.
- Uploaders can upload files only.
You can add members by typing an email address or selecting a group. Users who are not already registered can still be added; they are created as Guest users and receive Previewer rights by default.
When the automatic protection option is enabled, uploaded PDF, Microsoft Office, and image files are protected automatically. This is also where you define DRM settings such as expiry and printing control.
Files and Folders
Within each project, you can create folders and upload files to organize collaboration. Folder-level permissions can be used to further limit access inside the project.

- Files can be dragged and dropped directly into SecureDrive for upload.
- Right-click a file to open common actions such as download and view online.
- A file icon indicates protection status. If a shield is shown, clicking it protects the file; the icon then changes to a lock.
- The graph icon opens tracking information such as online views and access of downloaded files.
- The member icon lets you add or remove users who can access the folder. Inside a project, you can set permissions for each folder separately.
Common folder examples
- Contracts
- Financial Documents
- Board Materials
- Technical Documents
- External Review
Recommended practices
- Use clear folder names
- Limit access to sensitive folders
- Apply DRM settings to confidential files
- Review access before inviting external users
File Details
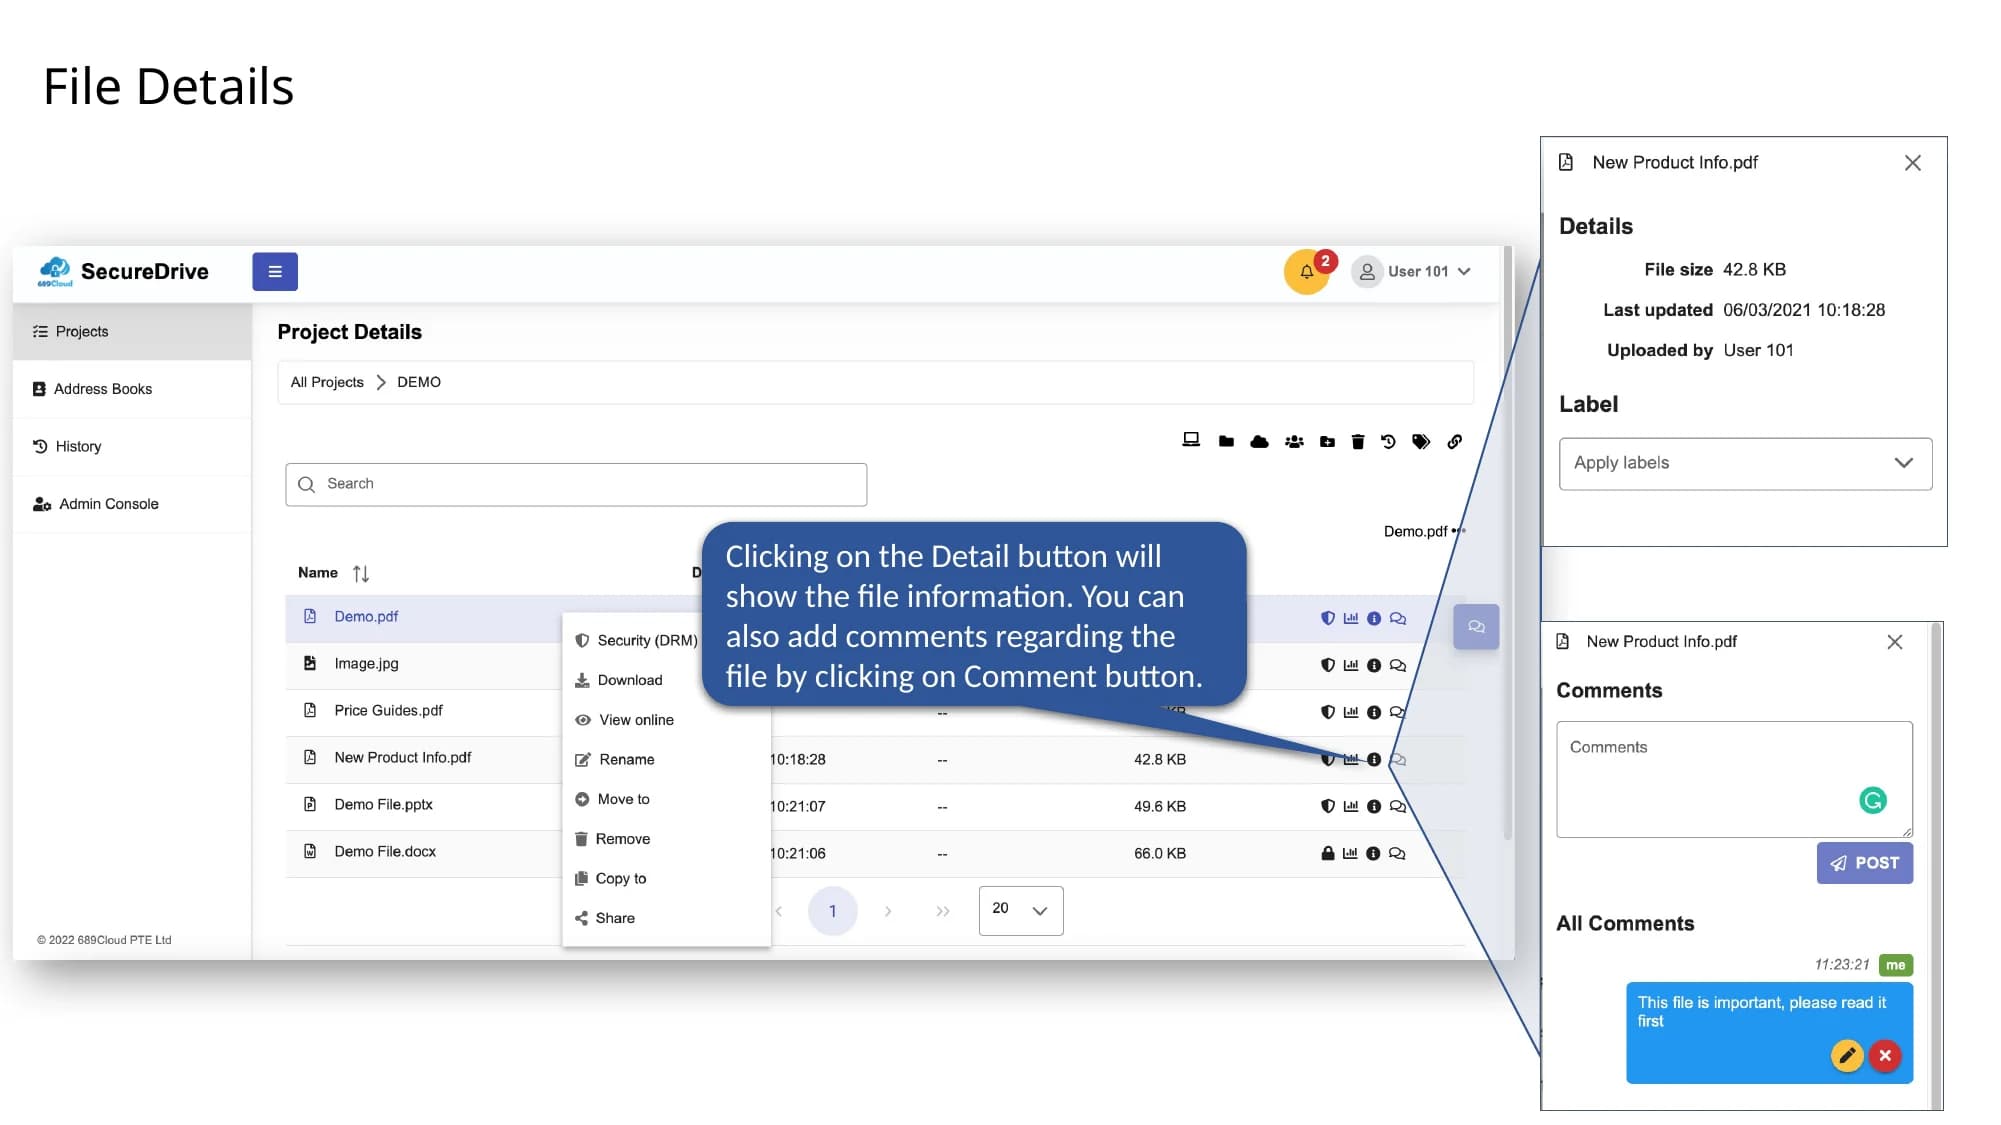
The file details area shows file information and provides access to file comments.
Open Details
Click the Detail button to view information about the selected file.
Review metadata
Use the detail view to confirm basic file information when troubleshooting or reviewing the correct document.
Add comments
Click Comment to add discussion or notes related to the file, keeping the collaboration context attached to the document itself.
Protecting and Tracking Files with DRM
SecureDrive allows teams to protect individual files and monitor their use after protection is enabled.
Protecting Files with DRM
Use DRM protection when you need to control who can open a file and what they can do with it after it has been shared.
Select the file
Go to the project folder that contains the file you want to protect.
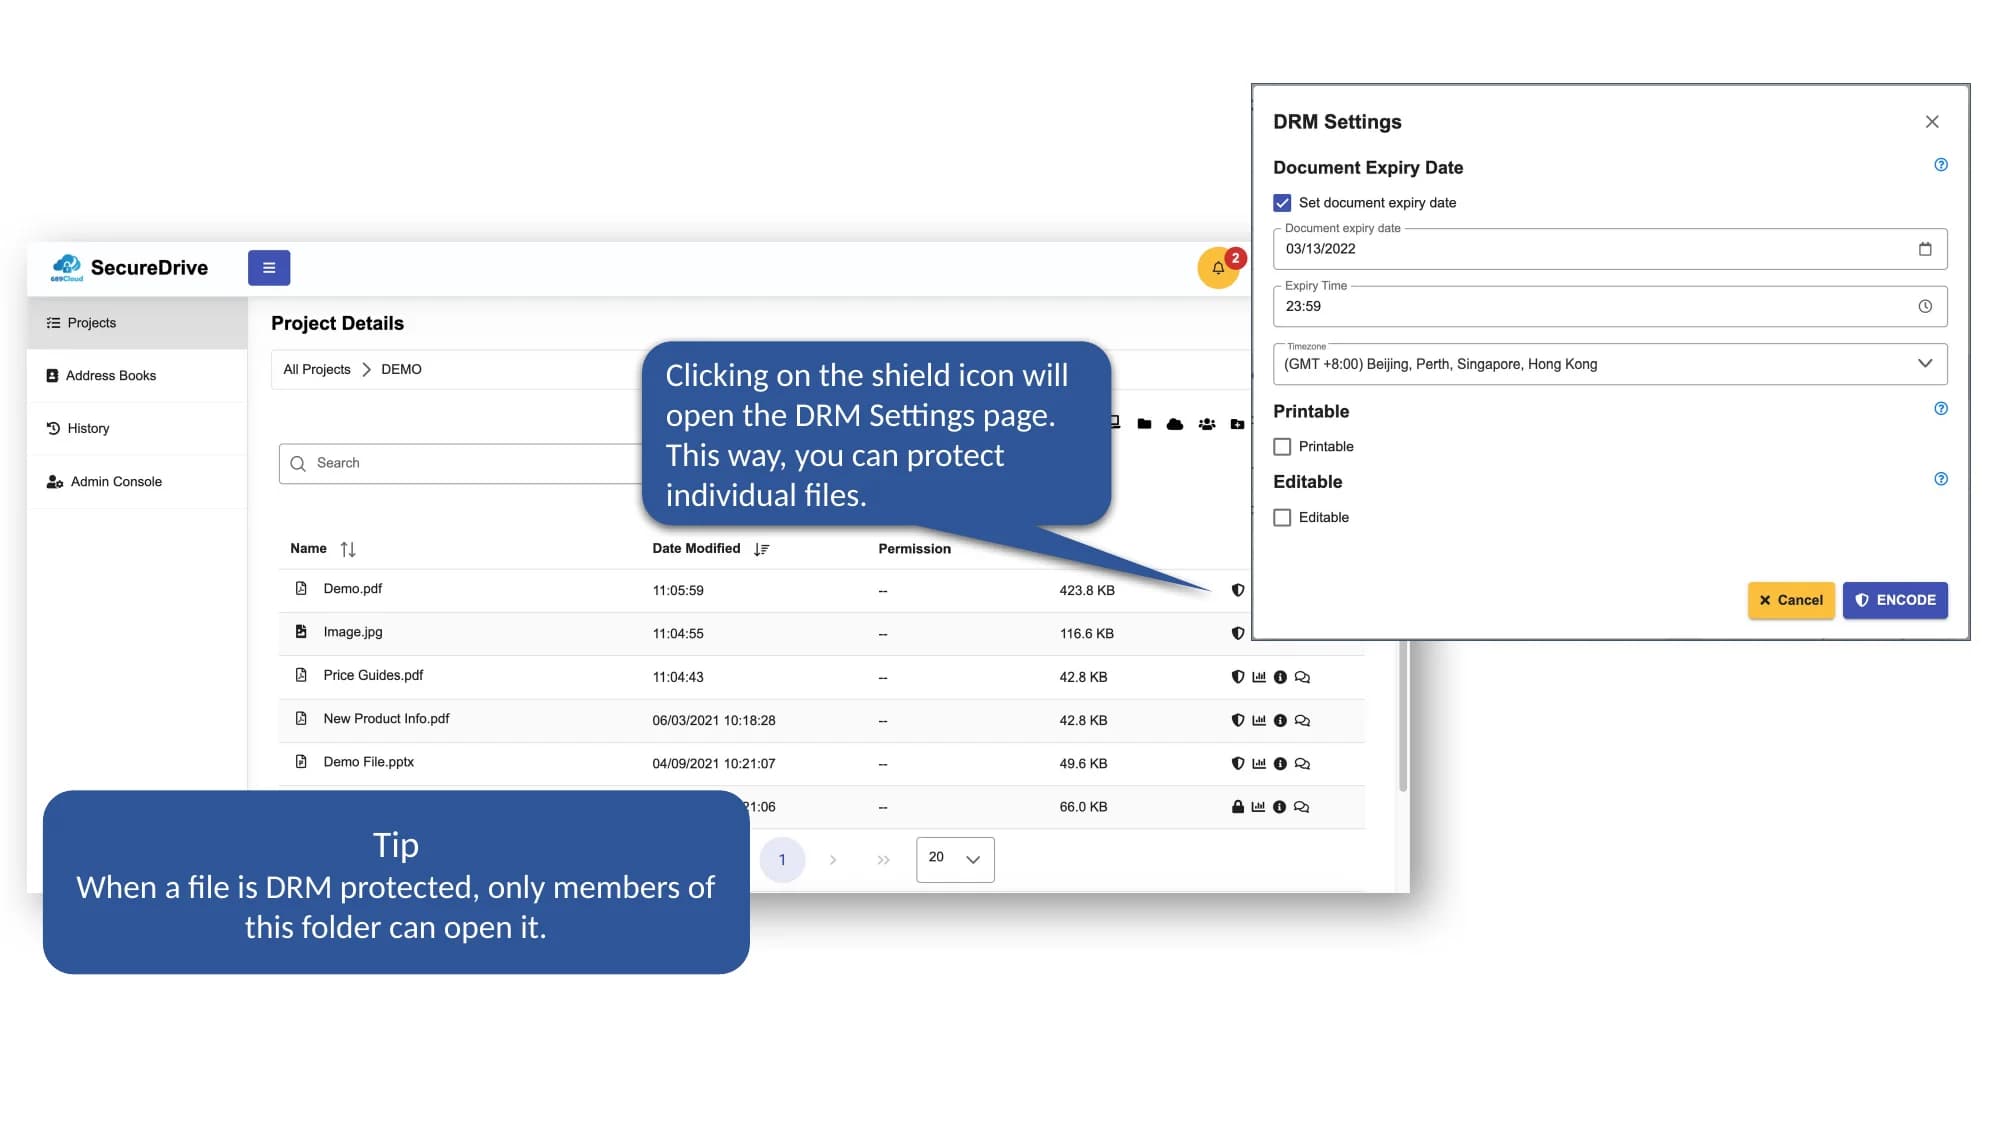
Click the shield icon
Clicking the shield opens the DRM settings page. You can also use this method to protect individual files even when automatic protection is not enabled for the whole project.
Configure DRM settings
Set the appropriate policies, such as expiry, printing control, watermarking, or other supported controls.
Save and verify protection
After the file is protected, only members of that folder can open it. Confirm that the protection icon and folder membership are correct before sharing.
Typical DRM controls
- View-only access
- Download control
- Printing control
- Copy and screen-capture restrictions for supported files
- Dynamic watermarks
- Expiry dates
- Remote revocation
Tracking Protected Files
Protected files can be tracked so that administrators and file owners can see how and when files are being accessed.
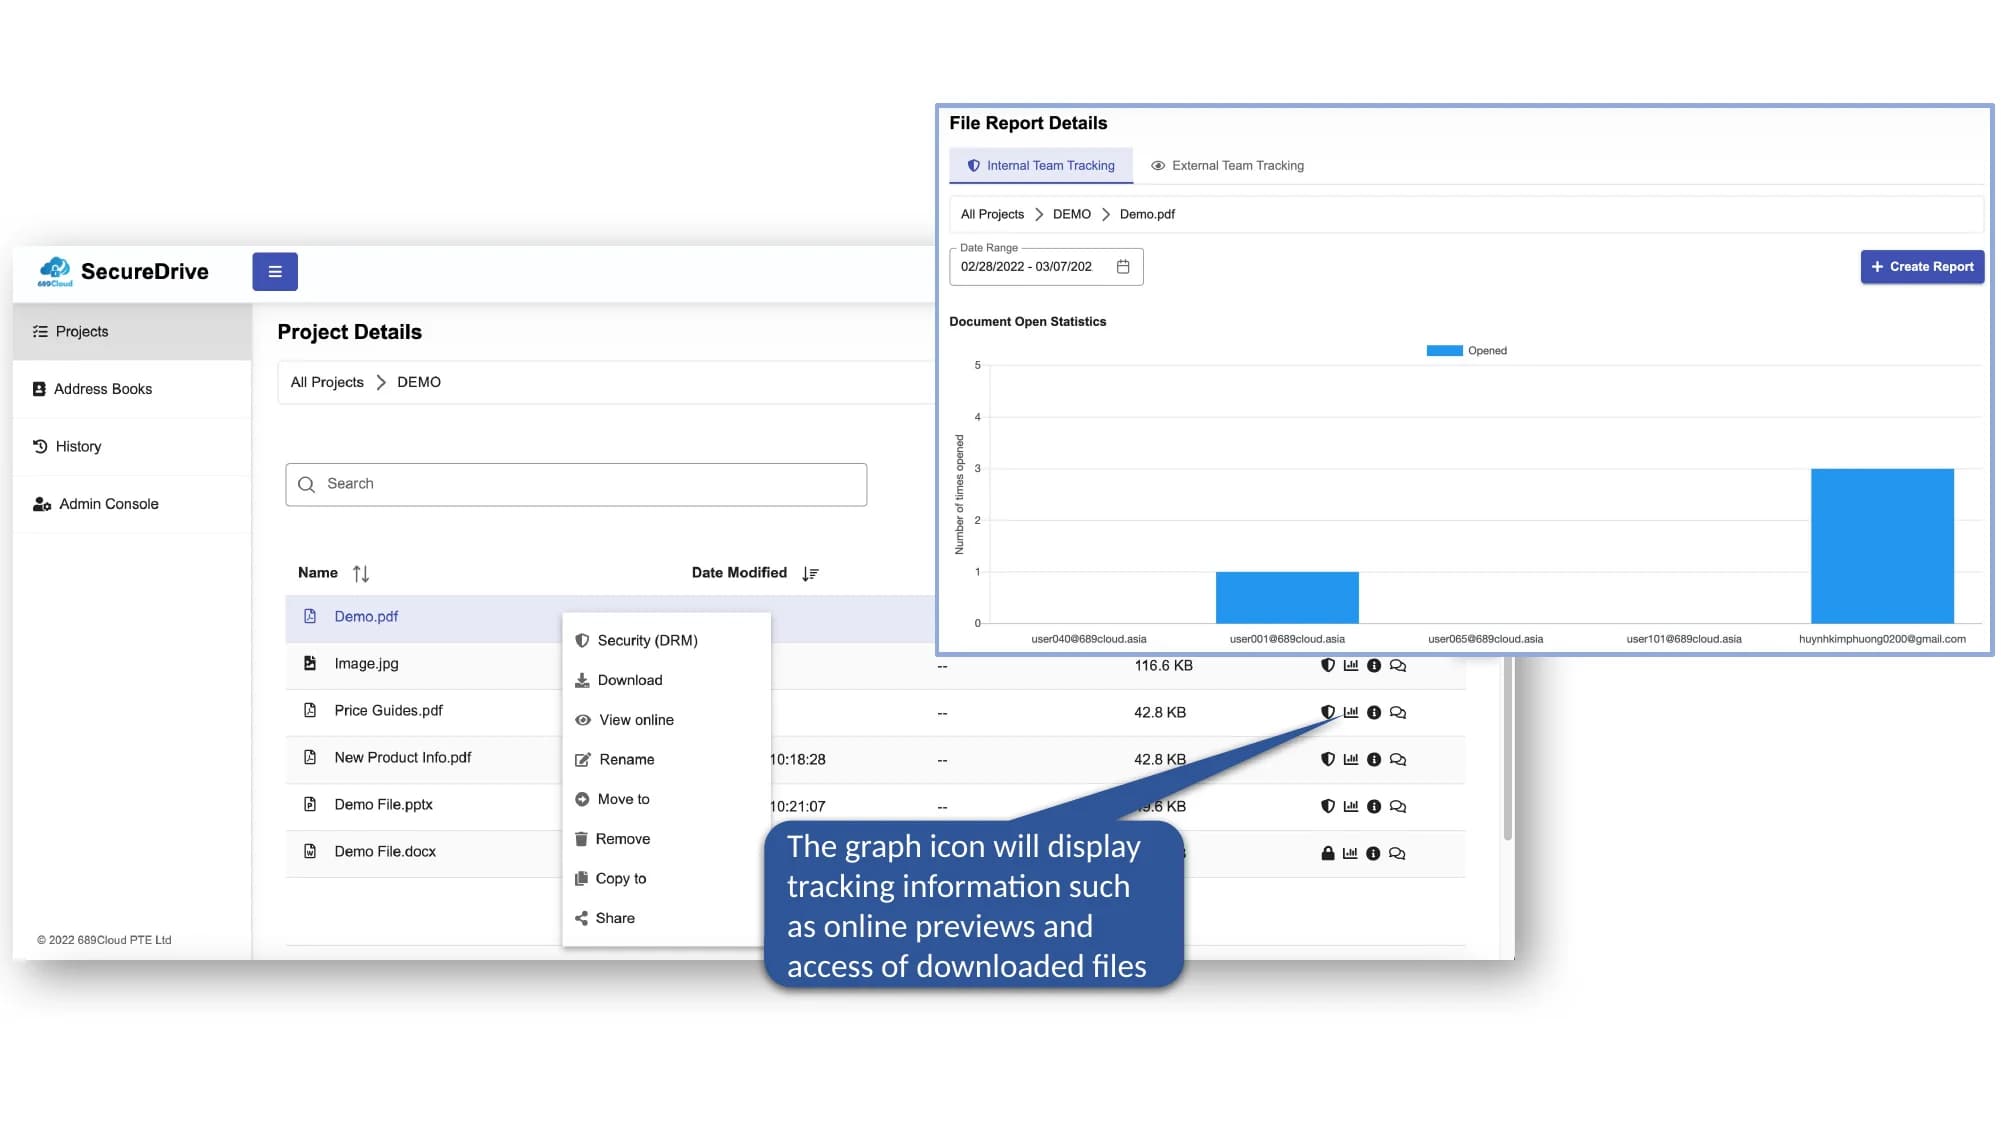
The graph icon opens tracking information for a protected file, including browser previews and access of downloaded files where supported.
Online Views
See when users preview protected files in the browser.
Downloads
Monitor when users download files from SecureDrive.
Local Opens
Track openings of protected downloaded files where supported by the file type and viewer environment.
Sharing Files with External Links
External links are useful when you need to share files with recipients outside your main SecureDrive team.
Sharing Files Externally Using Links

Right-click the file
In the file list, right-click the file you want to share and select Share.
Choose the delivery method
You can copy the generated link and paste it into your own email, or you can enter an email address and have SecureDrive send the link for you.
Handle unregistered recipients
If you send the link to an email address that is not already registered, it is added to the address book as an External user.
Sharing protected files
To share a DRM-protected file with an external user, enter the recipient’s email address in the sharing dialog so the protection rules can be tied to that recipient.
The Link Download Page
When a recipient opens a shared link, they are taken to a download page where they can either view or download the file, depending on the permissions you granted.

What recipients may see
- File name and file details
- View or download options
- Authentication prompt
- Expiry or access limitation message
How protected access works
- Clicking Download downloads the file
- If the file is protected, opening it requires 2-factor authentication
- Viewing a protected file online also requires 2-factor authentication
- Access is still subject to the file’s DRM and expiry settings